NSA Codebreaker Challenge 2023 Write Up
by Evan Shaw
The NSA Codebreaker Challenge is an annual challenge created and hosted by the National Security Agency to give students the opportunity to learn what kinds of problems the NSA tackles every day, and to utilize and improve their technical skills. It is open to students, faculty, and alumni of US based colleges and universities, and ran from September 28, 2023 to January 11, 2024. The challenge consists of 9 sequential tasks revolving around a (fictional) story line. Each task gets progressively more complicated and difficult. Last year I completed all 9 tasks, but this year I could only complete 6. Completing Task 6 put me at the top of the leaderboard for Purdue University, and makes me on of the 164 students who completed Task 6 out of 3383 challenge participants. This puts me at the top 5% of participants. Only 24 people completed Task 9 (0.7% of participants), making this year’s challenge significantly more difficult that 2022. What follows is my write up of how I solved and thought about each task. The text between the name of the task and “Solution:” is the challenge prompt, and the text after is my writing.
Task 1 - Find the Unknown Object - (General programming, database retrieval)
Points: 10
The US Coast Guard (USCG) recorded an unregistered signal over 30 nautical miles away from the continental US (OCONUS). NSA is contacted to see if we have a record of a similar signal in our databases. The Coast guard provides a copy of the signal data. Your job is to provide the USCG any colluding records from NSA databases that could hint at the object’s location. Per instructions from the USCG, to raise the likelihood of discovering the source of the signal, they need multiple corresponding entries from the NSA database whose geographic coordinates are within 1/100th of a degree. Additionally, record timestamps should be no greater than 10 minutes apart.
Downloads:
- file provided by the USCG that contains metadata about the unknown signal (USCG.log)
- NSA database of signals (database.db)
Solution:
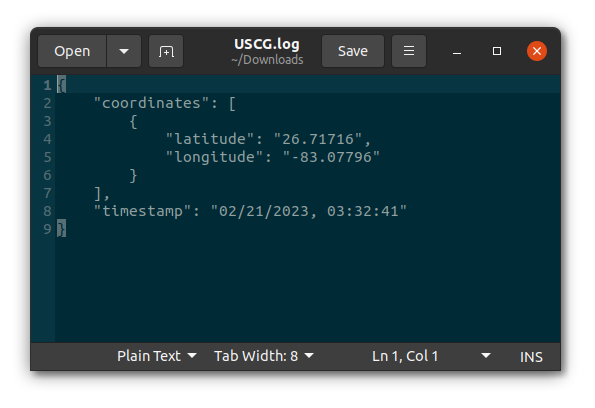
Task 1 provides two file downloads, the first is a very simple JSON entry detailing the latitude, longitude and timestamp of the unknown signal.
The second file is a SQLite 3 database containing several tables.
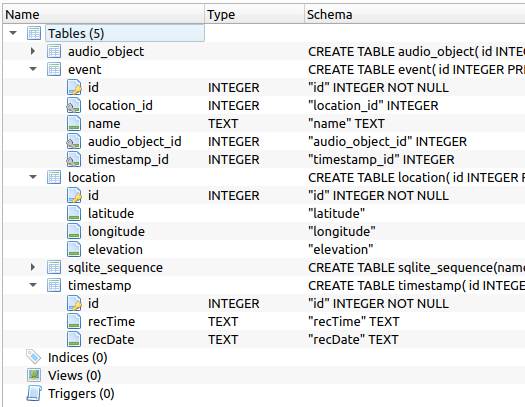
There are three relevant tables: event, location, and timestamp. Table event relates an event to a location and a timestamp. I don’t quite understand the point of putting the location and timestamp in different tables since there will seldom be a situation where two events somehow share an exact latitude and longitude, or share a timestamp. Very strange DB normalization going on here by the NSA.
To solve Task 1, we need to find events that have occurred within 1/100th of a degree of latitude and longitude. Unfortunately, no data type has been defined for the latitude and longitude columns in the location table, so we will need to cast it during the query.
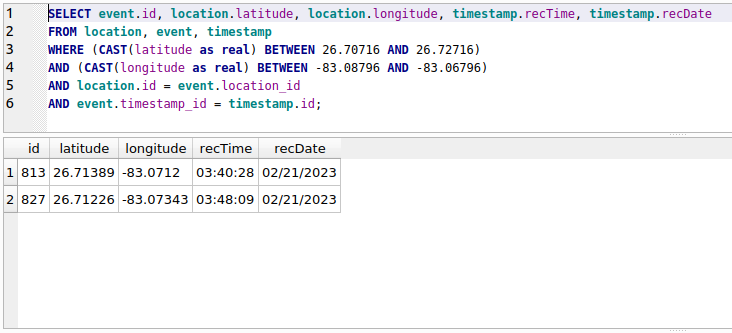
This query takes the Cartesian product of the location, event, and timestamp tables, then matches the rows that have the latitude and longitude within 1/100th of a degree. By visual inspection, we can determine that these two signal events are less than 10 minutes apart, which means these two events meet the requirements for the US Coast Guard to investigate further. Go get ‘em boys!
The solution to Task 1 is thus:
813
827
Task 2 - Extract the Firmware - (Hardware analysis, Datasheets)
Points: 100
Thanks to your efforts the USCG discovered the unknown object by trilaterating the geo and timestamp entries of their record with the correlating entries you provided from the NSA databases. Upon discovery, the device appears to be a device with some kind of collection array used for transmitting and receiving. Further visual inspection shows the brains of this device to be reminiscent of a popular hobbyist computer. Common data and visual ports non-responsive; the only exception is a boot prompt output when connecting over HDMI. Most interestingly there is a 40pin GPIO header with an additional 20pin header. Many of these physical pins show low-voltage activity which indicate data may be enabled. There may be a way to still interact with the device firmware...
Find the correct processor datasheet, and then use it and the resources provided to enter which physical pins enable data to and from this device
Hints:
- The pinout.svg has two voltage types. The gold/tan is 3.3v, the red is 5v.
- The only additional resource you will need is the datasheet, or at least the relevant information from it
Downloads:
- Rendering of debug ports on embedded computer (pinout.svg)
- image of device CPU (cpu.jpg)
- copy of display output when attempting to read from HDMI (boot_prompt.log)
Solution:
Semper Paratus! Our boys in blue have recovered the Spy Balloon! The first step is to look at the picture of the CPU.
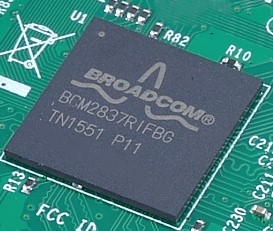
It appears to be a Broadcom chip, with the identifier BCM2837RIFBG. A quick google search shows that this is the CPU model for the Raspberry Pi 3 B.
Let’s take a look at the pinout.svg file we have been provided with.
This diagram shows a block of 40 pins, along with a secondary block of 20 pins. On the Raspberry Pi 3 B, only the block of 40 pins is available, so this board must be different from the stock Raspberry Pi board.
The task requires that we provide pins for positive voltage, ground, UART transmit and UART receive. Doing a quick google search, we can quickly find a pinout diagram for the Raspberry Pi 3 B. For the positive voltage requirement, we have a choice between Pin 1 and Pin 2. Pin 1 provides +3.3V while Pin 2 provides +5V. The correct decision here is probably Pin 1 because +3.3V is a more common CMOS voltage, while +5V is usually an older TTL standard. For the ground pin, we can chose Pin 6. This also matches the provided pinout. According to the Raspberry Pi 3 B pinout found online, Pin 8 is the standard UART transmit, and Pin 10 is the standard UART receive. Thus our submission is P1,P6,P8,P10.
However, upon submission, this was not the correct answer, and we get the response "GPIO headers powered. transmit function not detected. receive function not detected.". Upon review of the provided pinout.svg, we can see that P8 and P10 are “[unused]”. Given that the default pins are not used for UART, combined with the extra 20 pins available not usually found on the Raspberry Pi 3 B, we can assume that something has been changed about the board. We need to find the datasheet for the SoC.
The official Raspberry Pi docs state that the Broadcom BCM2837 is nearly identical to the BCM2836, which is nearly identical to the BCM2835, for which we have a peripherals data sheet, “BCM-2835-ARM-Peripherals.pdf”. Searching the doc for relevant references to UART yields the Alternative Function Assignments Table. According to the doc, “Every GPIO pin can carry an alternate function. Up to 6 alternate function are available but not every pin has that many alternate functions. The table below gives a quick over view.”

There are 6 Alternative Function Assignment options, and within each option, there are multiple UART transmit and receive capable pins. We need to find a way to narrow it down.
The third file provided, boot_prompt.log has a few generic boot lines. The last line is “Alternative Function Assignment : ALT5”. This is interesting because ALT5 corresponds to the last entry in the Alternative Function Assignments Table. The ALT5 column still describes three different sets of pins that can be used for UART: GPIO pins 14 and 15, GPIO pins 32 and 33, and GPIO pins 40 and 41. Of these sets, the only GPIO pins not marked “[unused]” on pinout.svg are GPIO pins 40 and 41. However, the GPIO number is not equivalent to the pin number. If we look at pinout.svg, GPIO pins 40 and 41 are actually P43 and P44. Therefore our submission is “P1,P6,P43,P44”. This is correct!
“Well done! All GPIO functions map to the correct physical ports of the headers. We can now interact with the device over UART!”
Task 3 – Analyze the Firmware – (Emulation)
Points: 200
Leveraging that datasheet enabled you to provide the correct pins and values to properly communicate with the device over UART. Because of this we were able to communicate with the device console and initiate a filesystem dump.
To begin analysis, we loaded the firmware in an analysis tool. The kernel looks to be encrypted, but we found a second-stage bootloader that loads it. The decryption must be happening in this bootloader. There also appears to be a second UART, but we don't see any data coming from it.
Can you find the secret key it uses to decrypt the kernel?
Tips:
- You can emulate the loader using the provided QEMU docker container. One download provides the source to build your own. The other is a pre-built docker image. See the README.md from the source download for steps on running it.
- Device tree files can be compiled and decompiled with dtc.
Downloads:
- U-Boot program loader binary (u-boot.bin)
- Recovered Device tree blob file (device_tree.dtb)
- Docker source files to build the QEMU/aarch64 image (cbc_qemu_aarch64-source.tar.bz2)
- Docker image for QEMU running aarch64 binaries (cbc_qemu_aarch64-image.tar.bz2)
Prompt:
- Enter the decryption key u-boot will use.
Solution:
Here we are given a binary of the U-Boot bootloader program that was on the device, as well as a compiled device tree file. We can use both of these to spin up an 64 bit ARM emulation to poke around. They also provide Docker images to run QEMU inside of, but these won’t be necessary. We can just run QEMU on a local machine.
Inside the provided Docker source file archive is a text file that contains a few shell commands to spin up the emulation. First, we create some shell environment variables that hold the path of the U-Boot file and the device tree file:
Next, we start up two new terminal windows and run netcat to listen on port 10000 and port 10001. Once we run the emulation, QEMU will transmit the output from the serial hardware interface to port 10000 and 10001.
Finally, we start the QEMU emulation with the provided shell command:
Immediately, we see boot output in the first netcat window that we created.
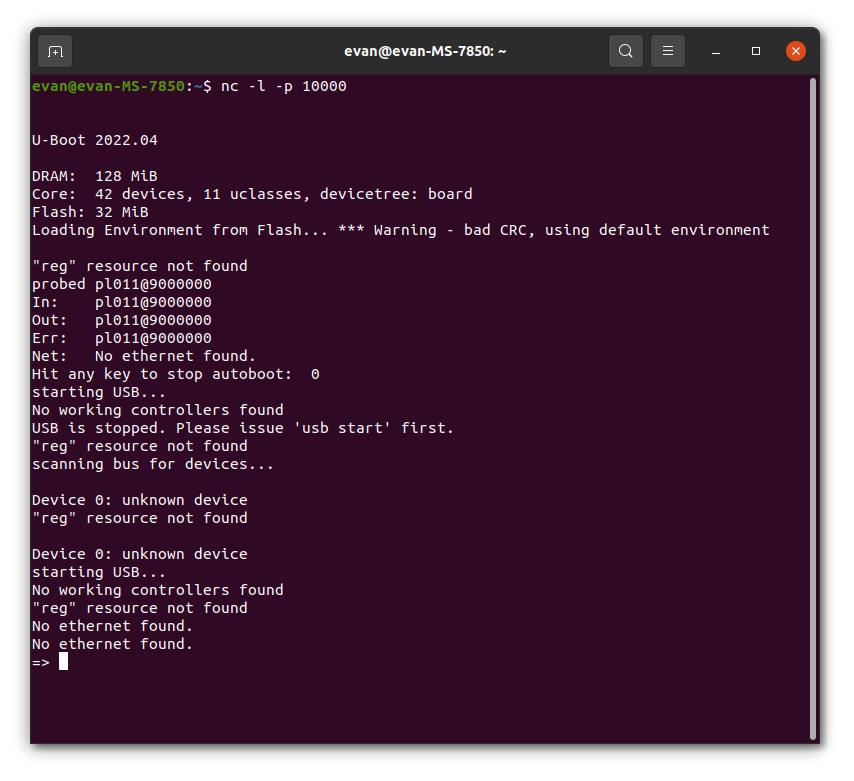
First, there is some information about the hardware of the device. Next, there is a warning about a bad Cyclic Redundancy Check in the firmware. This is apparently caused by changing the bootloader or the environment, but not updating the CRC code. This could be a clue that the bootloader was changed to encrypt the main firmware.
At the end of the boot output, the U-boot environment shell appears. A common thing to do when debugging U-Boot instances is to run printenv, which shows the environment variables.
Inside the output is an interesting line:
The value is a 32-bit address, so lets go there in memory! We can use the md command to display parts of the memory. The .b part prints the memory by bytes.
Which outputs the following:
This appears to be 16 bytes, which is 128 bits, which would be an appropriate size for a key. Clean up the spaces and submit:
Correct! We have finished Task 3!
Task 4 – Emulate the Firmware – (Dynamic Reverse Engineering, Cryptography)
Points: 500
We were able to extract the device firmware, however there isn't much visible on it. All the important software might be protected by another method.
There is another disk on a USB device with an interesting file that looks to be an encrypted filesystem. Can you figure out how the system decrypts and mounts it? Recover the password used to decrypt it. You can emulate the device using the QEMU docker container from task 3.
Downloads:
- main SD card image (sd.img.bz2)
- USB drive image (usb.img.bz2)
- Linux kernel (kernel8.img.bz2)
- Device tree blob file for emulation (bcm2710-rpi-3-b-plus.dtb.bz2)
Prompt:
- Enter the password used to decrypt the filesystem.
Solution:
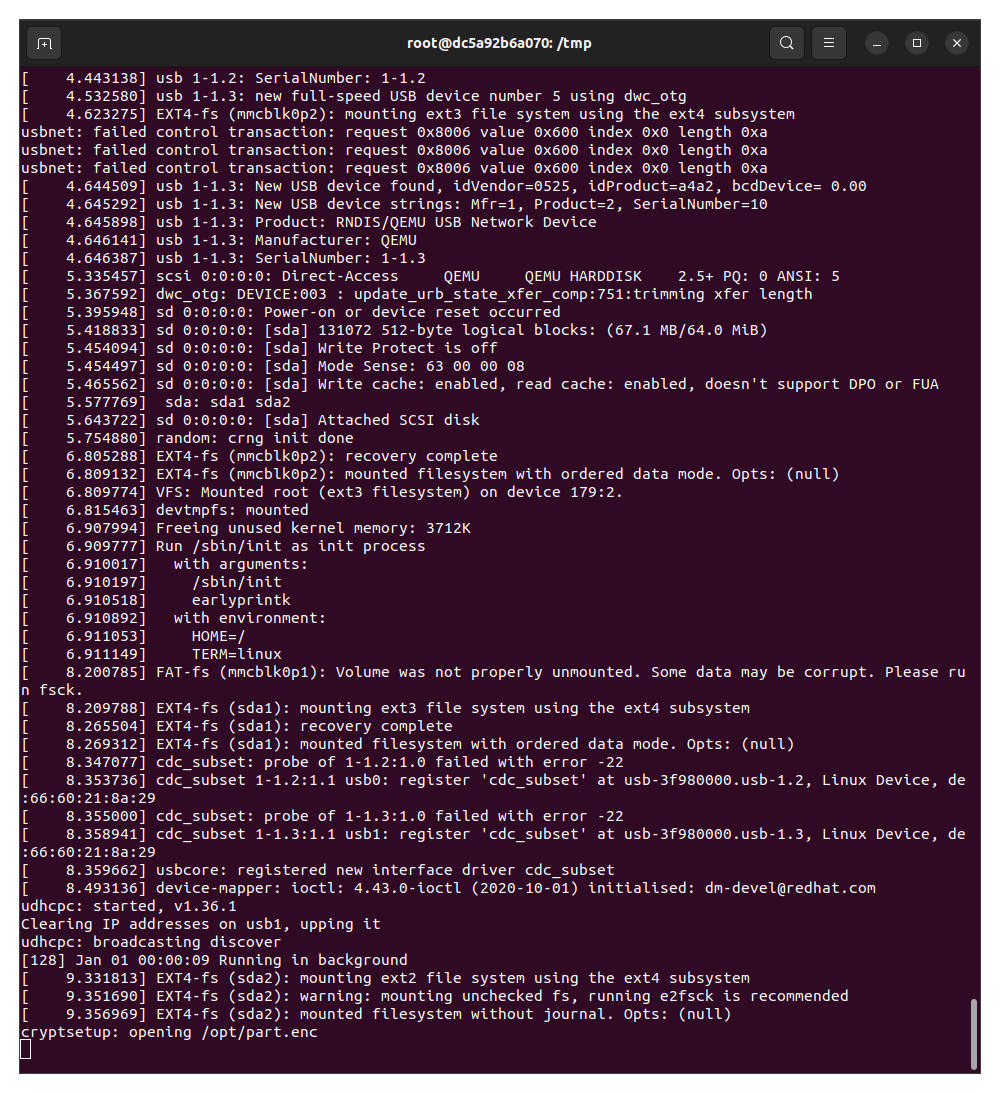
The set up for Task 4 is similar to that of Task 3: the README.md file within the Docker archive has commands to run the docker container and the QEMU guest. Once the QEMU guest starts, we see a linux boot log which pauses for around 30 seconds after displaying:
According to its documentation, “Cryptsetup is an open-source utility used to conveniently set up disk encryption based on the dm-crypt kernel module.” This could be the encryption referenced in the task description. After about 30 seconds, the QEMU guest allows a terminal to open.
Once we have a terminal, we can notice a few interesting paths. First, there is an irregular
directory under root called
agent, which is empty. The opt directory contains a shell script called
mount_part, and a binary file named part.enc.
Another nonstandard directory under root is /private. This directory contains 6 files:
ecc_p256_private.bin– a file containing 96 null bytesecc_p256_pub.bin– file containing a 64 byte ecc p256 keyid_ed25519– an OpenSSH ed25519 private keyssh_host_ed25519_key– an OpenSSH ed25519 private keyssh_host_ed25519_key.pub– an ed25519 public keyid.txt– 36 null bytes
The /etc , directory contains a Dropbear SSH installation, presumably so a remote actor can SSH into the device. It also contains a script within init.d to initialize the device’s network, as well as to run the mount_part script found in /opt. Most of the standard binaries one is likely to find on a linux system appear to be installed via BusyBox.
With the overview of the system out of the way, lets take a look at that mount_part script.
The first lines of the script assign variables to arguments 1-4. From the init script in /etc/init.d we can see how mount_part is called:
Thus the first part of the mount_part script is basically:
Now we can more easily tell what it is doing:
First it verifies that the part.enc file exists. This is the encrypted filesystem to be mounted. Then it creates the file /private, it mounts /dev/sda2 to /private. It then executes the binary hostname and assigns its result to the variable NAME Then it assigns the contents of the id.txt file to ID.
The next part of the script is the core functionality. The script takes the hostname, concatenates it with the first three bytes of id.txt, hashes those three bytes through the SHA1 hash algorithm, then passes the hash on as the password to cryptsetup unencrypting part.enc. After this happens, the encrypted filesytem is mounted at /agent.
Therefore, all we need to decrypt the filesystem is the hostname + the first 3 bytes of id.txt. However, id.txt is 36 null bytes. Therefore, we do not have all we need to decrypt. Poking around the sytem further confirms that there is likely no way to recover these nulled bytes. Therefore there must be another way to obtain the bytes. Since we only need 3 bytes, there is a good chance that we can simply brute force this.
3 bytes is 24 bits, so there are 2^24 = 16,777,216 possible combinations. This is quite a large number to brute force, especially because the encryption standard used in the encrypted filesystem is LUKS, which has an extensive hash process which makes any brute force orders of magnitude slower than a simple hash brute force. However, we may be able to reduce this number a bit. The id.txt file has 36 bytes, and it is a .txt format. This hints that the id may be a UUID. A UUID is a standard format of identification that is 16 bytes, however, its text version is formatted in hex separated by dashes : fe732b3c-25c8-4c6a-b69b-3d3e0f2b45e0 The total number of bytes in the text format of a UUID is 36 bytes. This can narrow down the 2^24 combinations to just the available hexadecimal digits in the first part of the UUID. Therefore, there are 16 possible combinations for each of the 3 digits which makes 16^3 = 4096 possible combinations. This is such a radical cut of combinations, that we can easily check the result of this brute force to test the UUID thesis.
To test this, we must first create a list of the possible hashes from all the possible combinations. Here is a python script to create that list.
This script takes the hostname “headyslave” and combines it with every combination of three hex characters. It then hashes each one through SHA1, then writes it to a file. This file is then fed into hashcat, a program for brute forcing passwords. There are a few brute force programs that can crack LUKS, but Hashcat appears to be the only one that can utilize the GPU. The command to hashcat is as follows:
The -a 0 option specifies a dictionary attack, the -m 14600 option signifies that it is trying to crack a LUKS volume, part.enc is the encrypted volume, and t4-pw-dictionary.txt is the password dictionary of the hashes we generated.
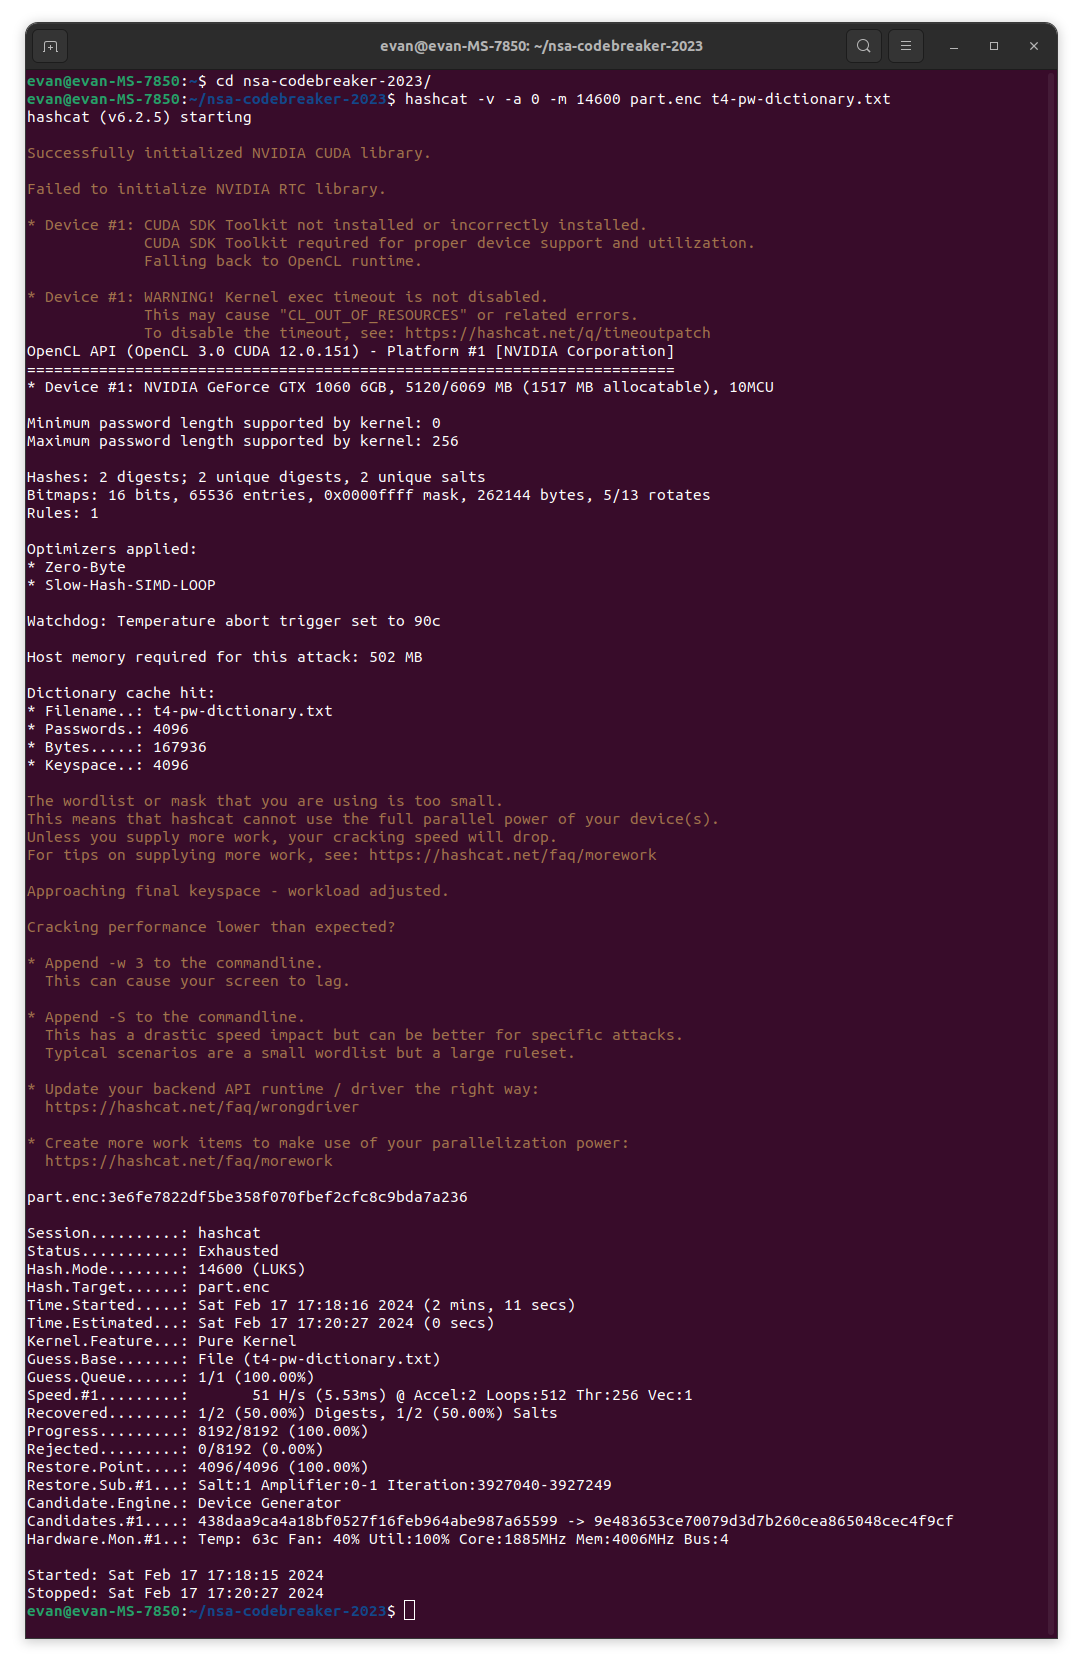
My rather old Nvidia GTX 1060 manages a hash rate of 51 H/s, which takes about 2 minutes to go through the entire wordlist. Hashcat did find a valid password for the encrypted volume:
part.enc:3e6fe7822df5be358f070fbef2cfc8c9bda7a236
This hash corresponds with the string “headyslave709”, which is interesting, because it doesn’t completely confirm that id.txt is a UUID, as it could still be a string of digits.
The hash given above works to decrypt the encrypted volume, and is the answer to Task 4!
Task 5 – Follow the Data Part 1 – (Reverse Engineering, Forensics)
Points: 500
Based on the recovered hardware the device seems to to have an LTE modem and SIM card implying it connects to a GSM telecommunications network. It probably exfiltrates data using this network. Now that you can analyze the entire firmware image, determine where the device is sending data.
Analyze the firmware files and determine the IP address of the system where the device is sending data.
Prompt:
- Enter the IP address (don’t guess)
Upon decrypting the file system on the spy balloon, we find three executables:
- agent
- dropper
- diagclient
We also find a 0 byte file named agent_restart, a text file named config, and a shell script named start. First, we’ll investigate the start script:
It looks like this shell script continues to run, and restarts the agent binary if the agent_restart file exists. When it starts the agent binary, it passes in the config file as the first argument.
Now let’s take a look at the config file.
Some significant things of note: the spy balloon might have an open port on port 9000, there are a few config entries relating to encryption keys, there are a few config items for the dropper binary, including dropper_config.
We are looking for the IP address that the spy balloon is uploading data to, but there doesn't seem to be any IP in the config. We probably have to reverse engineer the binaries to find the IP address. It is a possibility to do dynamic reverse engineering and run Wireshark to find out where the balloon is contacting, but this theoretically might trigger suspicious behavior and alert the threat actor, so sticking to static analysis is probably the move here.
It makes sense to reverse engineer agent first, because agent is run first and probably executes the other two binaries.
Loading the agent binary into the newly released Ghidra 11, we can see that it is an Aarch64 binary, which tracks with the Raspberry Pi 3 B. We can also see that the symbols have been stripped. This will make reverse engineering significantly harder. Also, it looks like Ghidra is having a little trouble with the calling convention on some function calls.
Ghidra 11 was recently released by the NSA with a new tool called BSim, short for Behavioral Similarity. This tool is a database that can ingest processed functions from other binaries, and compare the behavior of functions in the database with a function under analysis. This enables security researchers to identify familiar components from binaries and malware they have analyzed previously. It does not compare machine code directly, but its behavior, enabling identification of functions no matter the machine language. In my case, it helped greatly with identifying standard C library functions whose symbols had been stripped. During the challenge, I actually thought about creating a tool like this for a masters thesis or something, until I discovered that BSim had already been released.
A surface level reverse engineer of the agent binary revealed the following behavior:
- If the -h flag is given, the binary prints the help string and exits.
- A signal file descriptor is set up via signalfd
- If the config file doesn’t exist, exit
- The config file is read and parsed, and the results are stored in structures on the stack and in dynamically allocated memory
- Three threads are started:
- Thread 1 is the dropper thread, which periodically exfiltrates data by uploading files to a server
- Thread 2 is the collect thread, which presumably gets files from a radio receiver connected to the board
- Thread 3 is the command thread, which looks like a way for the threat actor to interact with the spy balloon
- Only the dropper thread is relevant to this task. The
agentbinary forks a new process into thedropperbinary with the executable path fordropperspecified in the config file. It also provides as arguments the dropper configuration file in config. Before forking intodropper, it checks whether the environment variablesDB_DATABSE,DB_COLLECTION, andDB_URLare set, and if they are, set those same environment variables for the newly executing forkeddropperbinary.
This means that we now have to reverse engineer the dropper binary.
Immediately after loading dropper into Ghidra, we can see that it is clearly a Golang binary. The first section in the binary is .note.go.build , which is indicative of a Golang binary.
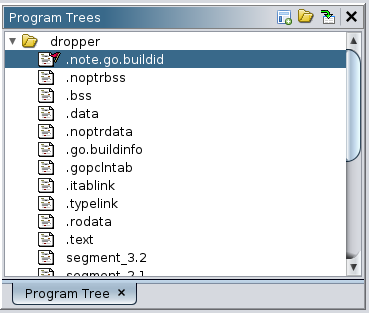
Luckily, this binary has not been stripped of symbols. This should make reverse engineering a lot easier, since all the functions are named by their package. The following is a surface level of what the binary does:
First, dropper reads the config file given by program arguments. Then it connects to a MongoDB database using the IP address in the config file.
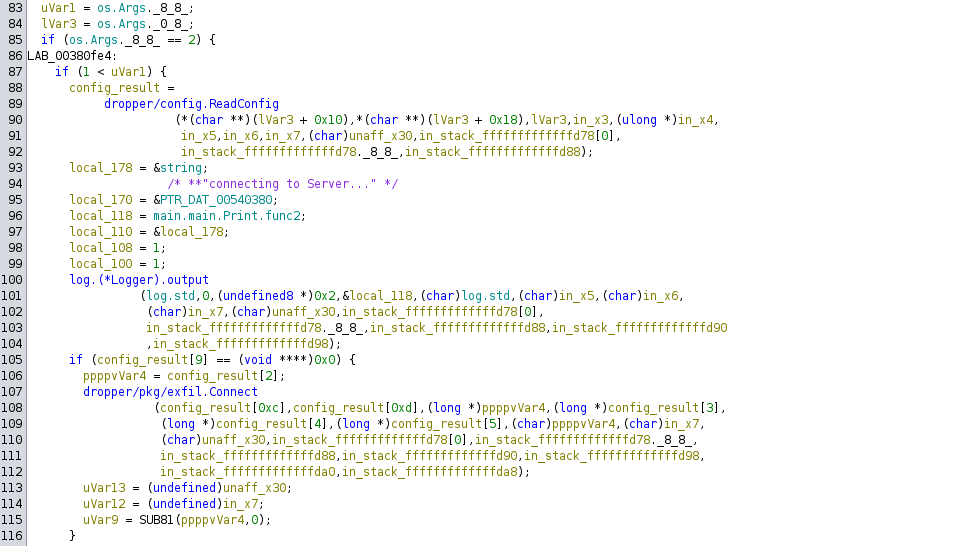
If this is successful, it walks the files in the /tmp/upload directory and calls the main.func1_00480468 function on them (presumably an inline anonymous function).

This function reads the file, then calls dropper/pkg/exfil.UploadFile and logs that the file has been uploaded. The exfil.UploadFile function inserts the file into the Mongo collection.
From this surface level reverse engineering we can thus determine that the purpose of the dropper binary is to take the files that the spy balloon has intercepted and upload them to a MongoDB server. However, the goal of Task 5 is to determine the IP address of the server to upload to, but we still do not have the config file for dropper.
Let’s look at the part of the binary that reads and parses the config file. This would be dropper/config.ReadConfig that is called in main.main.
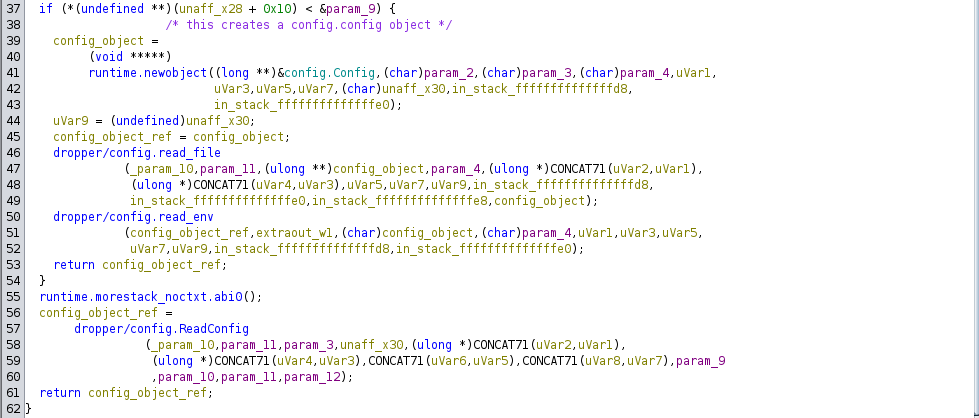
This function allocates a new object of type Config, calls config.read_file and config.read_env, then returns a reference to the allocated Config object. Going deeper, config.read_file appears to be a little more interesting.
First config.read_file opens the config file from the path passed in the arguments. If the file can’t be opened, then config.read_file calls config.read_file2. Afterwards, config.read_file appears to decompress the data it got either from opening the config from the arguments, or from read_file2 using Bzip2. Finally it decodes the decompressed YAML data and returns. So far we only have references to the config file given through arguments, except for what config.read_file2 returns, so lets take a look at it.
Config.read_file2 starts by opening the file /proc/self/exe . This is very suspicious, because /proc/self/exe is a symlink to the running program's binary. This means that dropper is actually opening its own source code. There are very few legitimate reasons to do this in a normal program.

It then seeks -4 bytes from the end of the file, then reads the last 4 bytes of the file into a buffer.

The byte order in the four-byte buffer is reversed, then used as a further offset to seek again within the file. Opening the dropper binary, we can see that the last bytes are 00 00 00 bc. The program subtracts 0xbc from -4, which is -0xc0, then it seeks to this location. The last offset of the dropper binary file is 0xAF3961. This offset subtracted by 0xC0 is 0xAF38A1.

This brings us to part of the binary that starts with BZh which is the start of the magic bytes of the Bzip2 format.
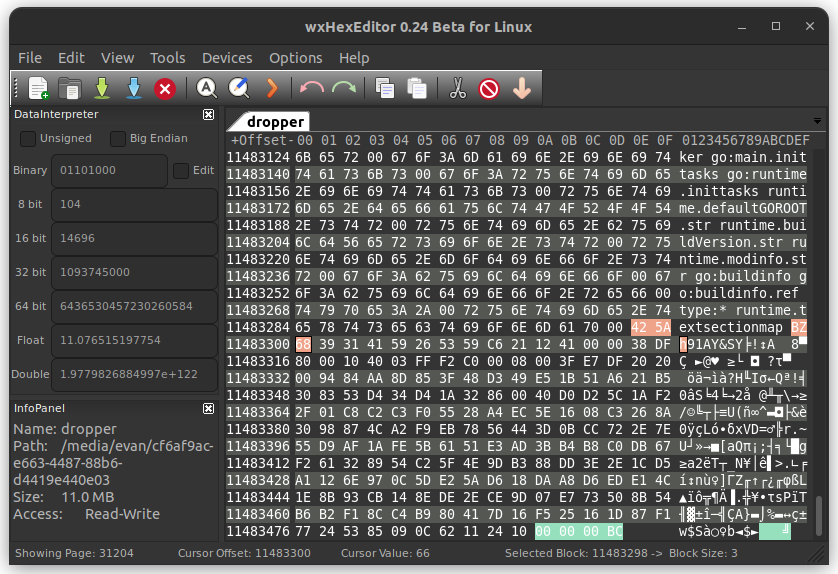
This brings us to part of the binary that starts with BZh which is the start of the magic bytes of the Bzip2 format. What follows it appears to be highly entropic, so this part of the binary is certainly compressed.
So essentially, if the dropper program can’t find its configuration file, it has a backup hidden at the end of its own executable!
Taking a few steps to extract the compressed data yields us with a YAML file:
This appears to be what we are looking for, since it names a MongoDB database, collection, username, password and IP address for the MongoDB server that the files are dropped at. Submitting the IP found in the hidden configuration file completes Task 5!
Task 6 – Follow the Data Part 2 – (Forensics, Databases, Exploitation)
Points: 800
While you were working, we found the small U.S. cellular provider which issued the SIM card recovered from the device: Blue Horizon Mobile.
As advised by NSA legal counsel we reached out to notify them of a possible compromise and shared the IP address you discovered. Our analysts explained that sophisticated cyber threat actors may use co-opted servers to exfiltrate data and Blue Horizon Mobile confirmed that the IP address is for an old unused database server in their internal network. It was unmaintained and (unfortunately) reachable by any device in their network.
We believe the threat actor is using the server as a "dead drop", and it is the only lead we have to find them. Blue Horizon has agreed to give you limited access to this server on their internal network via an SSH "jumpbox". They will also be sure not to make any other changes that might tip off the actor. They have given you the authority to access the system, but unfortunately they could not find credentials. So you only have access to the database directly on TCP port 27017
Use information from the device firmware, and (below) SSH jumpbox location and credentials to login to the database via an SSH tunnel and discover the IP address of the system picking up a dead drop. Be patient as the actor probably only checks the dead drop periodically. Note the jumpbox IP is 100.127.0.2 so don't report yourself by mistake
Downloads:
- SSH host key to authenticate the jumpbox (optional) (jumpbox-ssh_host_ecdsa_key.pub)
- SSH private key to authenticate to the jumpbox: user@external-support.bluehorizonmobile.com on TCP port 22 (jumpbox.key)
Prompt:
- Enter the IP address (don't guess)
Solution:
The first step to solving Task 6 is by attempting to connect to the server. Blue Horizon Mobile has provided us with an SSH jumpbox in order to get access to their internal network. To connect to the server we must first connect to the jumpbox. The following command binds an internal port on the local machine, to an IP address and port specified for a server on the internal network. Here we bind localhost port 27017 to the IP we found in the dropper configuration file.
We can connect using MongoShell, but to get a nice visual overview, we can connect using the Mongo GUI tool, MongoDB Compass.
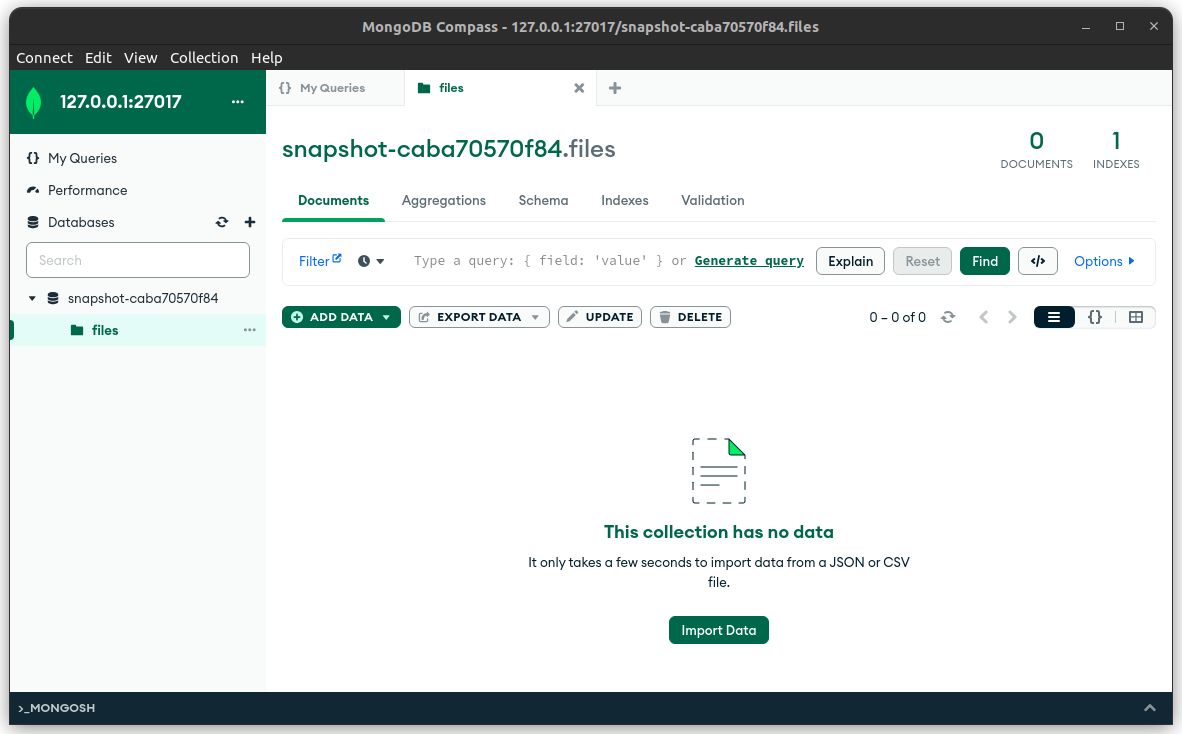
Connecting with MongoDB Compass, we can see that there is one database named snapshot-caba70570f84 with an empty collection named files. This must be the collection that the Spy Balloon uploads to in the dropper binary. Unfortunately it is empty, so we don’t really know how the data is formatted when it is uploaded without reverse engineering dropper further. However, this shouldn’t matter, because the goal of Task 6 is to find the IP address of the threat actor connecting to the database to exfiltrate the files.
Doing a quick google search, we find that there is a simple way to get the IPs of users connecting to the database: using the db.currentOp() command. Trying this however yields an error, as we are not authorized to execute this command.
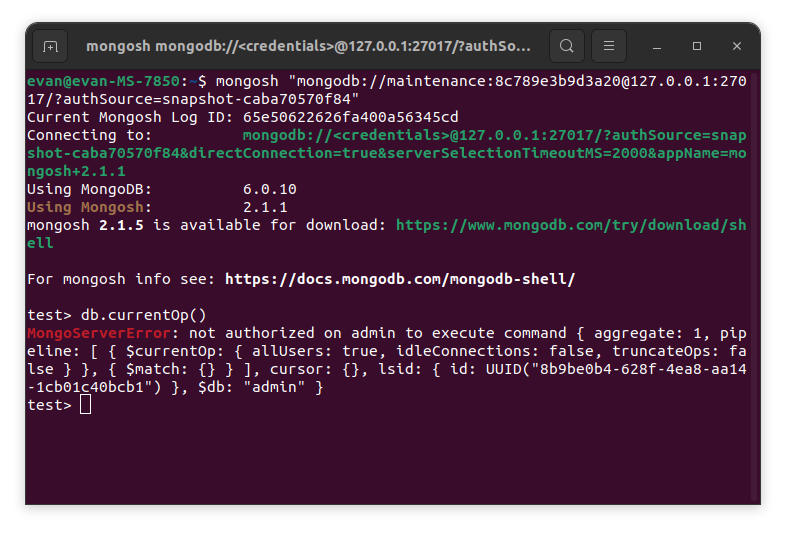
We are going to have to find an alternative way to access the IP of the threat actor. I spent about 30 hours reading through the MongoDB documentation trying to find an alternate method. After trying and failing at various methods (accessing logs, etc.), I finally discovered that the db.currentOp() command allowed passing the parameter $ownOps: true. Instead of returning all current database operations, this only gets the operations executing on the current user, thus requiring less privileges to execute. Executing db.currentOp({"ownOps": true}) in the shell yields another permissions error. This should not happen. It turns out that adding the parameter “$all”: true clears this up. I’m not quite sure why, it might be because it overrides the Mongo Shell putting the parameter $db: “admin” in by default. Doing this is successful, and we can see information about the current database operations.
In the task description, it states that the threat actor checks the database periodically, so we will have to write a script to keep sending these commands.
The db.currentOp() command is actually deprecated, and has been replaced with querying currentOps through the aggregation pipeline, so it was necessary to use and older version of the Python MongoDB driver. However, there is no way in the driver to specify “$ownOps”: true , so the above code would fail. If we look at the code in the driver, we can see that parameters can be passed through the spec parameter. Doing a quick edit to the driver, we can make the db.currentOp() command use “ownOps”: true. This change succesfully queries the database users' operations.
Running this Python script runs at about 100 times per second. After running the script for a day and getting no different IP s in the results, I started to lose confidence. I decided that my next step would be to upload a large data item into the database, just in case the threat actors' queries took to few time for the continuous db.currentOp() command queries to pick up. I decided to keep this script running just in case while I explored other options. When I woke up after the second straight day of running the script, I was surprised to find that it had found a different IP address of 100.82.251.46! This IP address was the answer to Task 6!
I believe that this solution to Task 6 was essentially a race, and after several million queries, my currentOp() just so happened to execute at the exact same time as the threat actor’s query. It would be interesting to know if I got lucky or unlucky by finding the IP through this method in two days. This solution would be a lot more robust if I had decided to upload a large document, but that would have required further reverse engineering dropper, and I discovered the threat actor’s IP before I could implement this.
When the challenge ended on January 11th, I learned that the best solution was actually a privilege escalation. Since the database user was given the userAdmin privilege, the database user could simply change their own privilege. Before landing on my solution, I did look at privileges and privilege escalation, but concluded that there was no way that the Mongo team would let anything like that happen, so I moved on to other solutions.
Conclusion
Task 7 involves reverse engineering the last binary diagclient. Since I didn’t finish Task 7 in time, I won’t go too in depth. When the agent binary receives a packet on UDP port 9000, it forks into diagclient and passes through a command. The diagclient runs this command, then concatenates the command’s results with diagnostic info about the hardware. It then creates an SSH terminal session with the server found in Task 6. It utilizes OpenSSH’s ForceCommand feature to make the SSH session only capable of opening the binary that runs the server. This binary was an HTTP server written in Golang, which accepted a JSON as input to a POST request. I then reverse engineered diagclient further to determine the structure of the JSON that it was submitting to the server. This is where I hit a wall. The intended solution was a path traversal attack in the date field of the input JSON, however, this was the one field that I did not think to fuzz.
All in all, I thought this year’s NSA Codebreaker Challenge was very fun, but it could be incredibly frustrating at times. This year’s challenge was definitely harder than last years, as I put much more time in this year and completed less tasks. The worst wall I hit was Task 7, which I worked on for about a week and a half before the challenge ended. Codebreaker has been a great intro for me into Software Reverse Engineering, and I am now considering that as a possible career. I can’t wait for Codebreaker 2024!